A Guide to Remove Unwanted Background Using Photoshop Tools
Adobe Photoshop is one of the most powerful software for image processing. This application has been widely used for various purposes. Whether it is retouching the image or doing random stuffs, you name it, Photoshop had it.
For designers, removing the background of an image is one of the most annoying job. I can relate to the pain and the suffering. And if you are new in the game, it will be frustrating for you. Trust me on that!
However, if you follow a distinct method, then you will be able to Background remove in an efficient way. So, stick here with us along the article. We will be discovering 5 ways to remove unwanted background using Photoshop Tools.
Adobe Photoshop: The Devil in Disguise!
Adobe Photoshop was first released in 1990. After the release of this magnificent application, people have started to use it on a mass scale. Today, even my 7-year-old nephew is working on his school project using Photoshop. Funny, isn’t it!
Anyways, there are an awful lot of features in today’s version. You can almost do anything you want. Apart from making the photo alive! You still can make it lively.
5 Steps to Remove Unwanted Background Using Photoshop Tools
Now, before moving on to describing the usage of those tools, I will have to clarify one thing. This guide to remove unwanted background using Photoshop tools are designed for the latest version of Adobe Photoshop.
The older versions, might have the same features, or may miss one or two. However, the basics are still the same. If you are using the older versions, then you might face slight difficulties in finding out the tools from the tools section.
But, once you get a hold on those, you will be able to work efficiently on older versions as well. Now, moving on to our first step.
Using Photoshop Quick Action
Pro Tip: This will work efficiently on monochromic background with well-lit subjects. Multi-colored or multi-layered background or dim subjects will face difficulties. This is the fastest way, but not applicable for all types of images.
Now, when you load the image on the canvas of Photoshop, you will be able to see the properties of it on the far right. Don’t worry if you can’t find that. It is probably not viewed.
Then all you need to do is to observe the top ribbon. You will find a view option. Clicking on to View, you will see a drop down of multiple components. Find out Window and Properties. In many versions, you will see a Window option on the ribbon. Click on that and select Properties.
Once you click it, you will be seeing a separate window on the far right. It will contain all the information of your image. Hence, named Properties.
Now, follow these simple steps to erase the unwanted background.
Step 01: Duplication of the Layer
Click on the layer options in the properties section. You will see a layer containing your image. Now, right click on the layer. When you right click it, you will see a drop down menu. Select Duplicate. It will create a duplicate layer of your image.
Creating a duplicate layer will allow you to compare between the post-edited and pre-edited version. I always recommend your designers to follow the comparison rule. Always compare your current work with the stock image.
Now, you will have to make this duplicate layer invisible. For that, if you observe the layer closely, you will see an ‘eye’ on the side of the layer. It indicated the visibility of the image. When the eye is open, that means that you can see the layer.
Closing the eye will make the layer invisible. It also makes it unable to edit. We will close the as of now, our main objective was to just create a point of comparison. Now, moving on to the next step.
Step 02: Quick Action
Now, as we have the original layer to work with, we will be selecting the layer first. There are two ways to select the layer. Either you can click on the layer from the properties section. It will activate the layer for editing.
Or, you can directly select the layer from your canvas. But, for that, you will have to enable auto selection mode. I recommend to select layers form the properties section.
It will allow you to choose the right layer. Often when you are working with tiny layers or multiple layers, you will face difficulty on selecting the right one from the canvas itself.
Now, as you have selected the layer, you will be seeing a Quick Action window just above the layers window. There is an option of removing the background. Click on it. And you will be seeing that the background is successfully removed.
Step 03: Final Touches
There will be times when the background will not entirely be removed using the quick selection tool. Some fragments might remain. That means, your job is not done. You will have to remove those manually.
Now, by the means of manually, I mean that you will have to erase those by hand. Speaking of erasing, you will have to use the eraser tool.
You will find the tool on the tool bar. Select the eraser, adjust the radius and start erasing. This will take some time if you are working on a jittery image. That means more fragments.
However, once you are done, you will have a good looking image with its background removed. This is perhaps the easiest and quickest steps of the list. The major downfall of this process is that your subject will have to be well-lit. The background should be simple and if possible monochromic.
As you realized, you will not always find such images right! For that, the next way might come in good use.
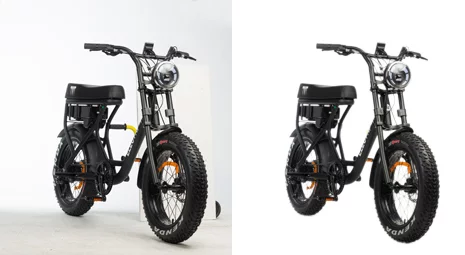
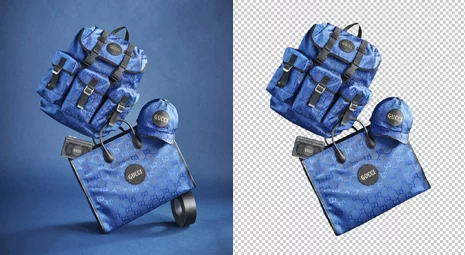
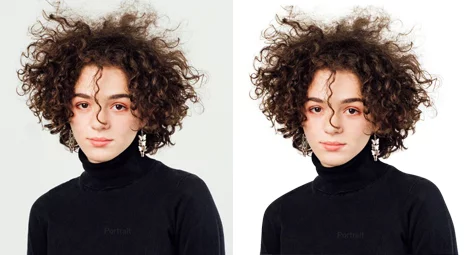
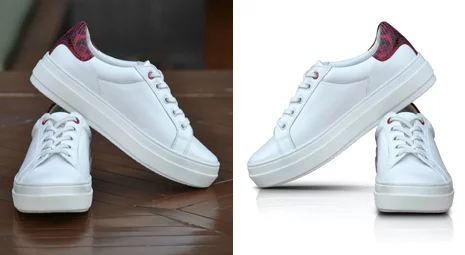
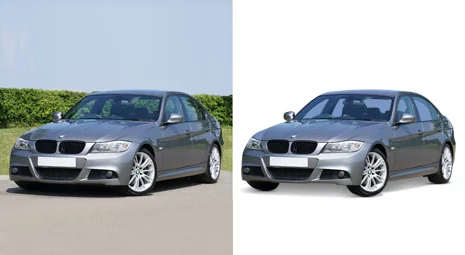
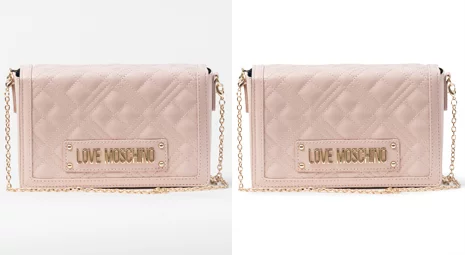
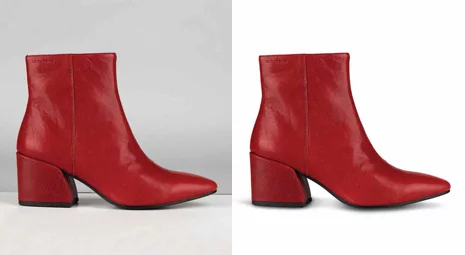
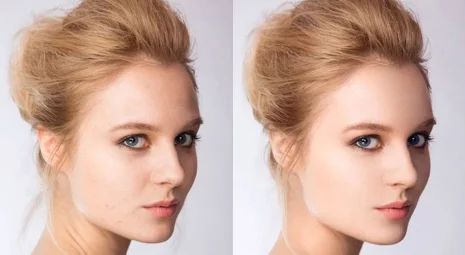
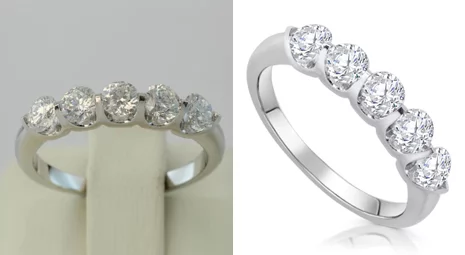
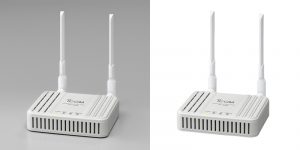
Some Example for remove unwanted background:
Using Background Eraser Tool
As you have just used the eraser, observe the tool option carefully. You will see a drop down point on the top left side of the icon. Clicking on that, you will find a Background Eraser tool! Yes, this lifesaving tool exists!
Now, follow these steps to get things done for you in no time. Pun intended, Photoshop requires a good amount of time and patience. The more your dedication and patience, the more you get in the final outcome.
Step 01: Duplicate the layer
I have already discussed about this step and the importance of it. So, this time, I will not describe the purpose. We will directly move down to the next step.
For this step, select the layer from the properties windows. Then you will have to select duplicate by right clicking on the layer. Turn off the visibility of the duplicate layer.
Step 02: Select Background Eraser Tool
Now, go to the tool bar section and right click on the eraser tool. You will be able to find background eraser there.
Select the background eraser and move on to the next step.
Step 03: Setting Up the Eraser
This step is very crucial and can get a bit messy if not done right. Now, when you select the background easer tool, first you will have to learn that this is not a regular eraser. You will have to maintain a set of things to get things done properly.
First, set the size. Now, you can set the size in two ways. When you select the eraser, you will find a brush size icon on the top ribbon. This will allow you to set the size of the eraser. Another option, a quick one of course is by shortcut keys. Use ‘[‘ & ‘]’ key to resize the brush.
Now, as we are done with the sizing, now we will be focusing on the hardness. It is very crucial as well. The hardness of the eraser will define the intensity of the erasing capability. The more hard the level, the more intense the erasing is.
So. As we want to completely erase the background, we will have to set the hardness to 100%. Now, another option which you will see is spacing. Spacing means the space between your strokes. I normally set that on 25%.
Lastly, you will find another aspect named tolerance. Tolerance is designed to measure the intensity of the colors in the background. The more the tolerance is, the more color it will be able to pick. So, set the tolerance on Pen Pressure as of now. We will me adjusting it accordingly.
Now, move on to the top of the ribbon again. Beside the brush icon, you will see a set of samplings. Select the ‘Continuous’ or basically the first icon on the group. It will allow you to use multiple continuous strokes throughout the process.
Now, set the limit to Find Edges. It will allow the eraser to find the edges of the subject while working on the image. Readjust the tolerance level to 20-25%. As the eraser is set up, you will have to move on to the actual working part.
Step 04: Work on the Edges
First thing after setting up the eraser, you need to refine out the edges. For that, start working on the edges. As the limit is set to find edges, it will easily find the edges. Start erasing slowly and nicely around the edges of your subject.
If it is accidentally erasing bits from the edge, then lower the tolerance and redo the missed parts. If it is keeping the background, then crank up the tolerance level by 5%. Working in multiple strokes rather than working on long strokes. It will allow you get back if you have done mistakes.
Zoom in and zoom out if necessary. Our main goal is to successfully refine the edges and separate the object completely from the remove unwanted background.
Step 05: Remove the Ruins
Now, as the edges are refined and completely detached from the background, erase the rest of the background. Now, work with a bigger size. You can easily resize the eraser.
Take a large eraser and strike it along the plane. Make sure that you don’t accidently hot the subject itself. Once you are done with it, you will end up with satisfying results.
Using this method required a fair amount of time. However, this is a good practice by using the right tools for the right job. One thing which you need to keep in mind that you will have to adapt constantly. Now, we will be moving on to the next method.
Using Pen Tool
Pen Tool is a powerful tool of Photoshop. This is one of the features between Photoshop’s insane popularity and success. Now, we will be using this tool to remove unwanted background from the image.
Now, we will be discussing the steps one by one. We will be straightly starting from step two, as step one is about creating duplicate layer of the actual image. This is mandatory, and is considered to be good practice. Anyways, moving on to the next step.
Step Two: Setting the Edges of the Subject
Pen tool, as discussed earlier is perhaps the most powerful tool in the arsenal. To use that, you will have to understand the functionality of it. The first thing you need to understand is the selecting functionality of the tool.
It will allow you to create a path on your layer, this path will work like customized selecting platform. When you end the path, or create a circular motion. You will be able to select the covered area. Cool, right!
This will allow you to do whatever you want to do with your selected area. We will be using this feature of the tool for today.
Now, there are certain aspects of this tool that you need to know. First, the anchor points. There are multiple occasions that you might need to change the direction of your flow. So when you want to change the direction, drop an anchor point just on the spot.
It will work as an anchor for the previous lines. Note that, you can set multiple anchor points. Now, the next thing that I want to describe is the curvature. Now, there will be times when you will be needing curved lines.
You can do that by placing multiple anchor points. But that won’t be logical if the curve is needed to be long and smooth. You can easily curve the line by holding the right click once you place an anchor on the other side.
Move your cursor up and down or sideways to adjust the curve according to your needs. This is exciting and easily saves a lot of time, especially when you are working with bigger objects.
Step Three: Redefine the background and Delete
So, as you have been anchoring and curving your way along the object, you will have to finish the path. For that, curve and anchor your way down to the first anchor point. When you reach it, you will have to place the finishing anchor on that.
This will allow you to define the selected area. Now, note that the running ants dictates the object itself as the selected area. You can do two things to detach it from the background. Either you can cut the object and place it on to another canvas with a transparent background, or inverse the area.
To inverse the area, go to Select and inverse. This will shift the selection area outwards. That means instead of the object, the background is now selected. As the best part of this is that you have already redefined the edges, you will just have to delete it.
For that, just press delete or backspace button from the keyboard. And Voila! You will get a clean object free from remove unwanted background. Now, we will be moving on to the remaining methods of removing unwanted background from the image.
Using Magnetic Lasso Tool
Magnetic Lasso is kind of the mixture of Pen and Lasso tool. However, the best part is that it can detect the edges all by itself. All you need is to start and hover closely to the object.
This tool will automatically detect the edges and place anchor points on free will. You will have to follow the steps to do that.
Note that I will not discuss the first step of duplicating the layers. We will be moving straight to the next step.
Step Two: Using Magnetic Lasso
So, first you will have to start from a point of your object. Select a bright edge to define the starting point. Select the magnetic lasso tool from the tool bar. If you cannot dins it, it is probably hiding under the lasso tool. Right click on the lasso tool or hold on to that. It will show the options.
You will see the magnetic lasso tool just there. Select the tool and place the starting anchor on the bright edge.
Now, slowly and steadily move the tool according to the flow of the edges. Notice that the tool is placing anchors at free will on the edges. Sometimes, it will not be able to place the anchor perfectly or will be unable to find the edge properly.
So, you will have to manually drop down the anchor yourself. Yes, by clicking on to the edges, you will be able to manually set the anchor. But don’t worry, you will be able to continue with the magnetic lasso tool and its functionality.
As you come around all the way back to the beginning, double click on the starting anchor to dictate the ending of the selecting.
Step Three: Inverse and Delete the Background
The process from here on is same as the pen tool procedure. You will have to inverse the selected area if you want to delete the background. Or you could cut the selected object and place it somewhere else, in another file.
By this way or the other, you will be able to delete the unwanted background. The biggest downfall of this process is that it is easy on simple backgrounds. However, poor quality on the images or any other issue might harden the process.
Now we will be moving on to the last process of removing unwanted background from the images.
Using Quick Selection Tool
Using the Quick Selection tool is yet another effective process, but this is personally my least favorite option. You will have to get a good quality on the image. And the object which you want to extract should preferably be brighter or high on contrast with the background.
Whatever the case is, using Quick Selection tool is very easy and faster than many other processes. Follow the given steps to get things done in no time.
Step One: Duplicate the Layer
One last time, learn to do this. It will save you in ways that even you can’t imagine, Trust me on this.
Step Two: Select the Tool
You will find the tool on the tool bar on your right side. Once you have selected the tool, start painting. Yes, you read it right.
Imagine that the tool is a brush and hover it around the object which you want to extract. This will auto-select the areas of the object itself.
Step Three: Inverse and Delete
Now, as you have selected the object, go to select and inverse. Press delete and done! You will have a fine object without the remove unwanted background.
Final Thoughts
Lastly, in my opinion, I prefer to work with the pen tool in majority of the cases. However, as options are unlimited, so their applications are. I would prefer to use all of these processes on various projects. You will have a good understanding.
Lastly, select the process that ‘suits’ the image. Try out new things and most importantly be creative and adaptive. Being creative will allow you to thing out of the box!